|
Lines |
Explanation |
|
2 |
This statement relates the GS that contains the menu definition. |
|
5-20 |
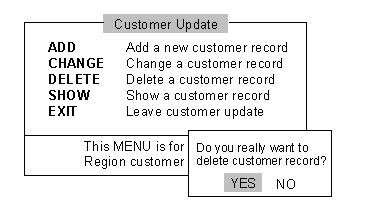
This PM trigger defines the trigger that is executed when the DELETE item is selected. The trigger is specified by the PERFORM statement in the related GS. This statement can be found in Example 2 on line 26. In this trigger, another menu, %delete_box, overlays the main menu (see Example 3). |
|
23 |
The GENERATE statement checks the syntax of the menu description in the layout segment. If any error is detected, the corresponding error message is displayed and the menu_id has the value of zero. |
|
|
If the menu has been previously generated, GENERATE is not performed. (A valid menu ID can never be zero.) This permits the menu to be easily and quickly re-used. This technique greatly increases the efficiency and response of invoking the menu. |
|
25 |
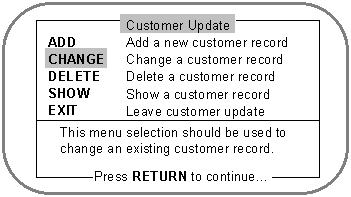
The MENU statement displays the same menu as in Example 1 (shown in Figure 6 of Example 1). If the help key is pressed when the cursor is pointing at the CHANGE keyword, its corresponding help box is displayed. See Figure 7. |
|
|
If the Return key is pressed at the keyword DELETE, the trigger delete_trigger is executed. At this point the %delete_box menu overlays the main menu as shown in Figure 8. After the selection (YES or NO), the proper action is performed, and ACCENT R returns to the main menu. If any other item is selected, control transfers to line 27. The system fields @MENU_CHOICE and @MENU_KEYWORD are set to the appropriate values. |
|
27-60 |
After the selection of an item other than DELETE, the proper action is taken. The system field @MENU_KEYWORD is used to determine which item has been selected. Using @MENU_KEYWORD instead of @MENU_CHOICE will allow the rearrangement of the selection items of the menu layout segment without recoding. |
|
62 |
This statement reserves the terminal screen for non-SMF processing. If working in a complete screen environment, this statement should be removed. Not using FLUSH or SCREEN KILL_SCREEN will preserve the generated menus for subsequent use. |

