Each executable Process Module (PM) section contains statements that can perform a number of functions:
Define the environment
Perform replacement and value modification
Initiate specific tasks
Produce output to the terminal or report files
Accept input from the terminal or a file
Control the sequence of processing.
Statements are entered into a PM at the edit level after a DEFINE PM or MODIFY PM command is given. Once the PM has been saved, the statements are executed when the PM is invoked by a command.
In the next few paragraphs there is a discussion of the general form for developing Process Modules and also a description of field identifiers or designators which are used whenever two or more fields to be processed have the same name. This is followed by a discussion on statements used to create reports after which all PM statements are described in alphabetical order.
All screen management statements are described in the SMF manual.
linenum [*; !] statement [HUSH] [IF; UNLESS clause] [iterate clause]
|
linenum |
is a line number assigned at the edit level when the Process Module (PM) object is defined. Each logical line must start with a number, and line numbers are assumed in all the forms throughout this section. |
|
* |
marks a statement that will compile and execute in DEBUG mode. It will be treated as a comment in production mode. The subcommand SAVE DEBUG causes the statement to compile, whereas SAVE without DEBUG causes the statement to be ignored. |
|
! |
indicates the beginning of a comment. A comment can begin on the line or be the last object on any line. |
|
statement |
can be any of the executable statements discussed later in this section. |
|
HUSH |
shuts off warning, error, and auxiliary messages for execution of that statement only. HUSH must appear before the IF; UNLESS clause and iterate clause, and does not apply to any message that might arise from problems with the IF; UNLESS clause or iterate clause. |
|
IF; UNLESS clause |
can be an IF or UNLESS relational expression that specifies the conditions under which the statement will or will not be executed. It can contain any of the conditionals described in Chapter 7. If the conditions in an IF clause are not satisfied, ACCENT R does not execute the statement, and proceeds to the next statement. If the conditions in an UNLESS clause are not satisfied, ACCENT R does execute the statement. If there is an iterate clause, the IF; UNLESS clause must precede it. |
|
iterate clause |
is used to execute a statement more than once. If there is an IF; UNLESS clause, the iterate clause must follow it. The iterate clause can contain any number of iteration loops which facilitates use of multiple occurrence fields, array processing, and output to multiple report files. The form of the iterate clause is: FOR \\fieldn = begn TO endn [BY incrn]\\ With each iteration definition separated by a comma. |
|
fieldn |
must be an INT, REAL, or FLOAT field defined in the DECLARE section of the PM. Using the default binary values substantially improves processing efficiency. If symbolic fields are specified with USAGE IS ASCII or BINARY, a warning message is displayed when the PM is saved that these fields will retard execution, but the PM will still be saved and will execute. |
|
begn |
is an expression specifying the beginning inclusive range of fieldn. |
|
endn |
is an expression specifying the ending inclusive range of fieldn. |
|
BY incrn |
is an incrementing or decrementing expression for fieldn. If BY incrn is omitted, ACCENT R assumes the incrementing value is 1. The incrn can be negative in which case the beginning value is the larger and the ending value is the smaller. Example: FOR MO = 12 TO 1 BY -1, YR = 90 TO 96 Each loop is iterated within the scope of the loop defined immediately before it. The values of begn, endn, and incrn are calculated at the start of iteration, and one iteration will always occur with the value of begn. |
10 TYPE I, I^2, I^3 FOR I = 10 TO 100 BY 10
10 PRINT DESC(I,J),FIRST_VAL(I,J),SECND_VAL(I,J) &
IF SECND_VAL(I,J)>5000 FOR I=1 TO 10, J=1 TO 10
10 PRINT @TOF IF @LINE GT 55
NOTES: The number of characters allowed per line is controlled by the system field @TERM_LINE. @TERM_LINE can be changed by the user. The default value is 525 characters.
If an IF; UNLESS clause and iterate clause are present in the same statement, the IF; UNLESS clause will be applied for every loop iteration. In other words, the combination of IF; UNLESS clause and iterate clause on a single statement is logically the same as:
START:10 FOR
(IF;UNLESS):20
PM statement
CONTINUE:20
REPEAT:10
The use of more than one iteration control level on a single statement is functionally equivalent to:
START:10 FOR...
START:20 FOR...
START:30 FOR...
statement
REPEAT:30
REPEAT:20
REPEAT:10
Thus, to process multiple-dimensional arrays in their storage order, the most active subscript should be iterated at the innermost loop in the above example.
Because ACCENT R allows a number of Data Set (DS) objects to be in use at the same time, it is quite possible to have two or more fields with the same name available for processing at the same time. So that ACCENT R can recognize and process the correct fields, append one of the designators given below to the field name in question. It is recommended that these designators be used even when there is no duplication of field names, particularly for transaction, declared, and auxiliary fields, as the designators speed compilation and simplify PM maintenance and readability.
When looking for a field value, ACCENT R assumes the order of preference shown in the following table if the fields do not have designators. The master SD is searched first, then the transaction SD, and so on. Auxiliary DSís are searched in the order in which they appear in RELATE statements within the CONTROL section.
The default designator for fields in the BEFORE:T, UNMATCHED:T, AFTER:T, and UNQUALIFIED:T sections, if none is specified, is :T.
If building records in a READY area, fields must be further identified with :R suffixes.
|
DESIGNATOR |
FIELD IN |
|
:M |
master DS |
|
:T |
transaction DS |
|
:D |
DECLARE section of the current process |
|
:designator (as assigned in the RELATE statement) |
auxiliary DS |
|
:M:R |
fields in the master READY area |
|
:T:R |
fields in the transaction READY area |
|
:designator:R (as assigned in the RELATE statement) |
fields in the auxiliary READY area |
Table 13-2 Designators for Field Names
For fields having more than one occurrence, the subscript specification in parentheses follows the designator suffix, as follows:
fieldname:designator(subscripts)
fieldname:designator:R(subscripts)
AMOUNT:M + PAY_AMT:D TO TOT_AMT:D(YR:D)
PRICE:M + QUANTITY:T TO INV.AMT:M:R
PRINT (SUM AMOUNT:M - LIMIT:AUX7) IF AMT:D > LIMIT:AUX7
The Report Output statements control all aspects of report formatting, including spacing, page size, line placement, and content of subheadings. The report output statements are: CENTER, EJECT, ON, PRINT, REFERENCE, REPORT, SKIP, TAB, and TURN statements.
In Process Modules (PM) that create reports, the statements SKIP, TAB, EJECT, PRINT, CENTER, and TURN have two ways to reference the report to which they apply:
In any executable section except TITLES, HEADINGS, and FOOTINGS, these statements have an optional ON n clause which is used to give the report number, where n can be an integer or a field.
Within the TITLES, HEADINGS, and FOOTINGS sections, however, they must be preceded by a REPORT n statement, where n must be an integer. The ON n clause within the statement is then unnecessary.
The TITLES section references a report with the REPORT statement.
TITLES SECTION
REPORT 1
SKIP TO 30; CENTER "Detail Report" AT 40
PRINT SKIP 3, TAB 34, @DATE, @CR
REPORT 2
PRINT SKIP TO 30, "Summary Report For", @DATE
The SUBHEADING section references a report with the ON clause.
SUBHEADINGS SECTION
ON REGION
PRINT ON 2 "*** FOR REGION ", REGION, @CR
ON CITY
PRINT ON 4 "** IN CITY ", CITY, @CR
An ON clause can be used in the TITLES, HEADINGS, and FOOTINGS sections to override a preceding REPORT n statement.
TITLES SECTION
REPORT 1
SKIP TO 30; CENTER "Detail Report " AT 40
REPORT 2
PRINT SKIP TO 30, "Summary Report For ", @DATE
PRINT ON 1 SKIP 3, TAB 34, @DATE, @CR
The last statement will be applied to REPORT 1.
If only one report is being created, neither the REPORT n statement nor the ON n clause can be used. If more than one report is being created, then one of the two must be used for every report output statement.
The report identifier n can be either a number or a declared field, so long as it evaluates to a number from 1 to 10. For example, if declaring a field X in the DECLARE section, use the following statement which prints the current date on each of reports 2, 3, and 4.
PRINT ON X @FDATE FOR X = 2 TO 4
On the other hand, n in the REPORT n statement can only be an integer between 1 and 10.
ACCENT R provides a very flexible approach to programming. It allows several tasks to be combined in one Process Module (PM). It is very important to select the correct command that executes a PM.
Each command has a unique purpose. That purpose affects how the statements in the PM act and which records they affect. For example, identical assignment statements are put in two PMís - one to be used with the EXTRACT command and the other to be used with the UPDATE command. When the PMís are executed, the assignment statements affect the records in the master Data Set (DS) in one PM. The same statements in the other PM affect the output DS, not the master DS.
There are other important ways in which the executing command affects the design of a PM - some of them quite subtle. For that reason, the discussion on the following pages considers each command that can execute a PM. Other details that are explained include:
which record processing sections that can be used with the given command.
which statements can be used to manipulate records.
which subsets of records are affected by the statements and sections allowed.
whether or not the section chosen to contain a statement affects the results of that statement.
how clauses in the command fit into the processing done by the sections and statements in the PM.
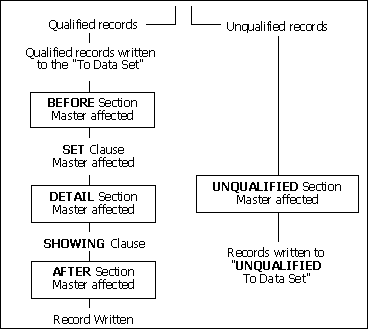
A high-level flow diagram for each command shows the order in which command clauses and PM sections are executed.
The ALTER command is designed to modify qualified records in the master Data Set (DS). It may also save a copy of those records in their unaltered state for backup. Therefore, in a PM executed with the ALTER command, field assignment statements and SETUP TO OMIT MASTER statements apply to qualified records in the master DS. However, they do not affect output DSís. There is no output DS for the unqualified records. However, they can be modified in or omitted from the master DS. The master must be related for UPDATE.
The SHOWING clause uses the field values as modified by the BEFORE and DETAILS sections. Records deleted by SETUP TO OMIT MASTER are also shown.

Figure 13-3 Alter PM
ALTER IF CITY = "SAN JOSE" TO SANJOSEONLY &
SET 0 TO AMOUNT SHOWING DEPARTMENT &
UNQUALIFIED TO OTHERRECS VIA DO_SAN_JOSE
A PM executed by the CHANGE command can take one of two forms. One form uses normal command prompting for changes. The second form suspends normal prompting and take changes only through the PM. A PM with normal prompting is accessed by the VIA pm_name clause. A PM without normal prompting is accessed by the VIA pm_name ONLY clause.
A PM called by CHANGEÖVIA pm_name is generally used for validating changes. It can also be used for manipulating records. Normal prompting occurs and all other CHANGE clauses are allowed. All values are accepted and confirmed before the DETAIL section executes. Validation should occur in the DETAIL section. SET, CHECK, DETAIL, and AFTER do not execute for records affected by SETUP TO IGNORE or OMIT in the BEFORE section. SETUP TO IGNORE CHANGED RECORD, SETUP TO OMIT MASTER, and assignment statements are allowed in DETAIL and AFTER. If setup to ignore changed record is executed in any section the updated record will be written back to the Master Data Set. Applies only to the current record and is reset for each record entered. If setup to omit master is executed then the current record will be deleted for the Master Data Set.
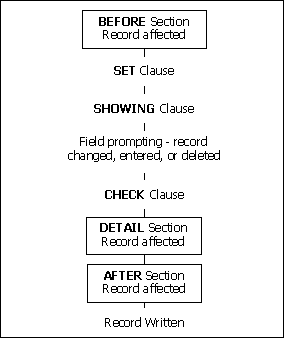
Figure 13-4 CHANGE PM
CHANGE VIA pm_name ONLY suspends normal field prompting. All changes must be entered through ACCEPT statements in the PM. However, this option can be combined with the record retrieval options, the SHOWING clause, and the CHECK clause. These built-in features can be used for record selection, display, and confirmation.
When CHECK is in effect and the response to the confirmation check is "N", fields are restored to their previous values. The BEFORE section executes again for the same record. It is possible to use ACCENT Rís pre-programmed confirmation check in combination with specifically tailored prompts for data simply by putting the prompts and ACCEPT statements in the BEFORE section of the PM. Since the SHOWING clause executes after the BEFORE section, it can be used to display corrected data. The record is still available for further processing in the DETAIL and AFTER sections.
In the BEFORE section, SETUP TO IGNORE CHANGED RECORD prevents the record from entering the PM. In the DETAIL section, it ignores changes and retains the record in its original state. SETUP TO OMIT MASTER can be used to OMIT a record in either BEFORE or DETAIL. If setup to ignore changed record is executed in any section the updated record will be written back to the Master Data Set. Applies only to the current record and is reset for each record entered. If setup to omit master is executed then the current record will be deleted for the Master Data Set.
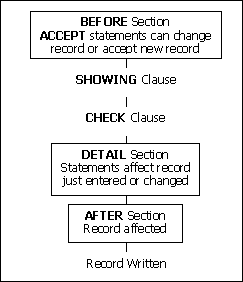
Figure 13-5 CHANGE...ONLY PM
The DELETE command deletes qualified records from the master Data Set (DS). The DS must therefore be related for UPDATE. Two output DSís can be created, one for the deleted records, and one for the undeleted records. In a PM called by the DELETE command, the qualified records pass through the BEFORE, DETAIL, and AFTER sections. Assignment statements and SETUP TO OMIT MASTER can be applied there. However, since the records are no longer in the master DS, the statements affect also the deleted output DS. Unqualified records can be modified or omitted by PM statements; for unqualified records, modifications and omissions affect both the master and the undeleted output DS.
The SHOWING clause uses the values of the fields as modified by the BEFORE and DETAILS sections. Records deleted by SETUP TO OMIT MASTER are also shown.
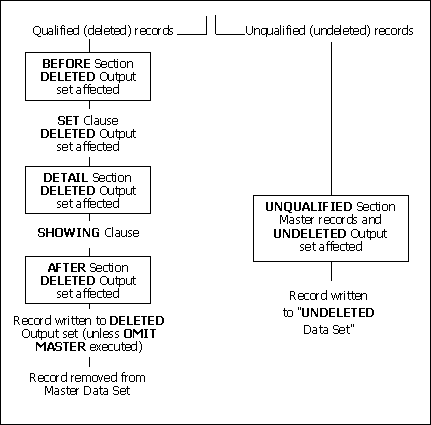
Figure 13-6 DELETE PM
*DELETE IF INVSTATUS = "PAID" DELETED TO CANIT &
UNDELETED TO SAVEIT SHOW DEPARTMENT &
SET "DROP" TO INVSTATUS VIA PURGEPAID
A PM called by the ENTER command can take one of two general forms. One form uses the normal prompting for new data that is supplied by the command. The other suspends normal prompting and takes data through the PM only. A PM for use with normal prompting is accessed by the VIA pm_name clause. A PM for use without normal prompting is accessed by the VIA pm_name ONLY clause.
When the PM is executed without the ONLY option on the VIA clause, normal prompting occurs. All other clauses of the ENTER command are allowed. This form is generally used for data validation. Data entry through PM statements is also allowed. This can be used for ďsilentĒ assignment of values. All values are accepted and confirmed between the BEFORE and DETAIL sections. The BEFORE section should be used only to set values to fields that will not be accepted interactively. Validation should occur in the DETAIL or AFTER section. DS must be related for UPDATE. Setup to omit Master will inhibit writing of the record to the Master Data Set.
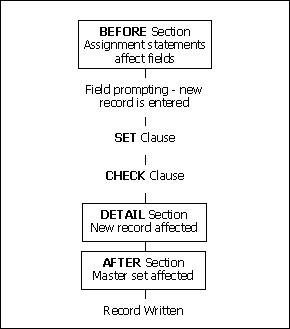
Figure 13-7 ENTER PM
When the PM is executed with the ONLY option, the normal prompting supplied by the command is suspended. All data must be entered through ACCEPT statements in the PM. However, this option can be combined with the CHECK clause, which executes after the BEFORE section but before the DETAILS section. When CHECK is in effect and the response to the confirmation check is "N", the record is re-initialized to blanks, zeroes, or nulls. The BEFORE section executes again for the same record. It is possible to use ACCENT Rís pre-programmed confirmation feature in combination with specifically tailored prompts for data by putting the prompts and ACCEPT statements in the BEFORE section of the PM. The record is still available for further processing in the DETAIL and AFTER sections. The DS must be related for UPDATE. Setup to omit Master will inhibit writing of the record to the Master Data Set.

Figure 13-8 ENTER... ONLY PM
The EXTRACT command displays information from a DS on a terminal screen. It can also copy the DS records into another DS. Therefore, the master DS must be related for INPUT. Assignment statements and SETUP TO OMIT MASTER do not affect the master DS. However, both assignment and omit statements affect the qualified and unqualified records written to output DSís.
If MULTIPLE is specified, each record goes through the SET clause and the DETAIL section one time for each conditional clause in the command. It will also affect that copy of the output record. The BEFORE and AFTER sections, however, execute only once for each qualified record.
The SHOWING clause uses the field values as modified by the BEFORE and DETAILS sections. Records deleted by SETUP TO OMIT MASTER are also shown.
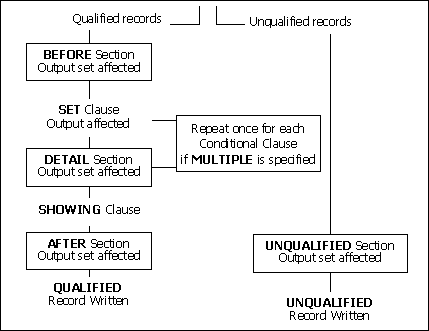
Figure 13-9 EXTRACT PM
The LOAD command copies data from a formatted ASCII SF to the master DS. The master DS must be related for UPDATE. The field/skip list is applied to the SF data when a PM is called by LOAD. The fields for the new record are entered between the BEFORE and DETAIL sections. Value assignments can be made for fields in BEFORE. Any values assigned to fields coming from the SF are overwritten when the data comes in after the BEFORE section. Assignment statements and SETUP TO OMIT MASTER can be specified in the DETAIL and AFTER sections. The SHOWING clause and SET clause are not allowed with the LOAD command.
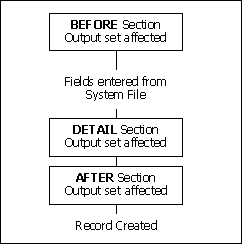
Figure 13-10 LOAD PM
When a Process Module (PM) is executed by the MERGE command, it applies assignment statements, SETUP TO OMIT MASTER, and SETUP TO OMIT TRANSACTION to the merged output Data Set (DS). It does not apply them to the master or transaction (unless the master or transaction is named as the output DS).
The statement SETUP TO INCLUDE TRANSACTION (which copies the transaction record to the end of the master DS) can be included in the BEFORE:T, MATCHED, AFTER:T, or UNMATCHED:T section. It affects only the output DS. Since MERGE is already putting transaction records into the output DS, a SETUP TO INCLUDE TRANSACTION statement duplicates the transaction record in the output DS.
Unqualified master and transaction records cannot be modified or omitted.
The SET clause only affects the records from the Master Data Set.
The SHOWING clause shows both master/transaction qualified records that are merged as being modified in any sections before the AFTER section. Records omitted by SETUP TO OMIT MASTER (TRANSACTION) are shown in the SHOWING clause.
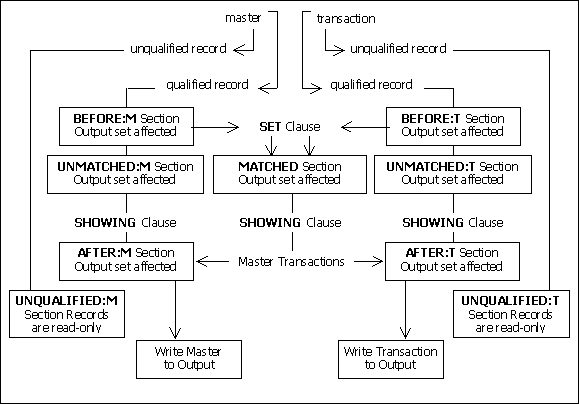
Figure 13-11 MERGE PM
PURGE deletes qualified, matched master records from the master Data Set (DS). Therefore, assignment statements or SETUP TO OMIT MASTER applied to these records affect only output DSís. PURGE can create output DSís for copies of the following subsets of records:
PURGED:M (matched) MATCHED:T
UNPURGED:M (unmatched) UNMATCHED:T
UNQUALIFIED:M UNQUALIFIED:T
Unmatched or unqualified master records can be modified or omitted. Statements in these sections affect both the master DS and the output DSís.
For transaction records, assignment statements or SETUP TO OMIT TRANSACTION apply to the applicable output DS. Assignment statements affect the transaction DS if it is related for UPDATE and the statement SETUP TO REWRITE TRANSACTION is included in the section. SETUP TO OMIT TRANSACTION affects the transaction DS if it is related for UPDATE.
The statement SETUP TO INCLUDE TRANSACTION (which copies the transaction record to the end of the master DS) can be included in the BEFORE:T, MATCHED, AFTER:T, or UNMATCHED:T section. It affects both the master DS and the PURGED:M output DS.
The SET clause only affects the records from the master DS. It affects the PURGED:M output DS and the SHOWING clause.
The SHOWING clause [SAVE clause] shows only master records, as modified in BEFORE:M and MATCHED. Records omitted by SETUP TO OMIT MASTER are shown.
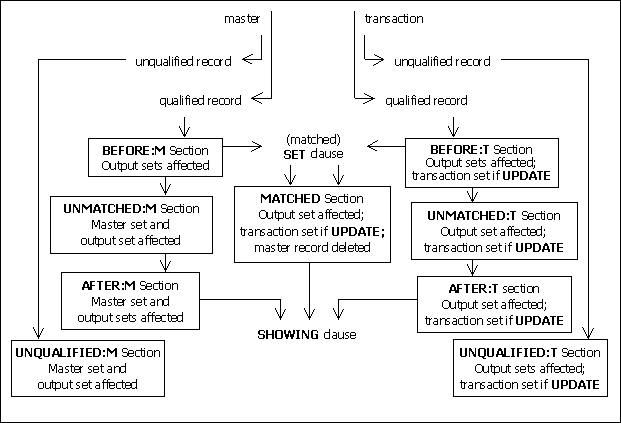
Figure 13-12 PURGE PM
The REPORT command should be used to execute PM's for report generation. If reports are needed after any operation on a DS (sorting, deleting, or updating), the reports should be created by the command that performs the other operation(s). Creating reports by a separate PM after another operation is completed requires another pass through the data.
A PM called by the REPORT command must declare the DS for input. No modifications or record deletions are allowed. It is possible to report on both qualified and unqualified records.
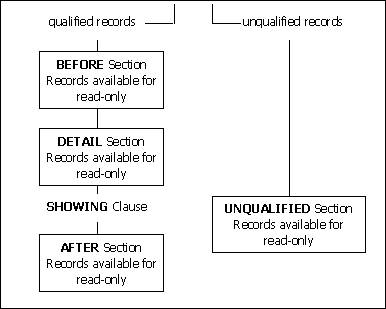
Figure 13-13 REPORT PM
The SELECT command is designed primarily to display or save records. In a PM called by SELECT, assignment statements and SETUP TO OMIT MASTER affect qualified and matched output records only. They do not affect the master DS. Unqualified master records can be modified or omitted in the output DS only.
SELECT can create output sets for any of the following subsets of records:
MATCHED:M MATCHED:T
UNMATCHED:M UNMATCHED:T
UNQUALIFIED:M UNQUALIFIED:T
For transaction records, assignment statements and SETUP TO OMIT TRANSACTION apply to the applicable output DSís. Assignment statements affect the transaction DS if it is related for UPDATE and the statement SETUP TO REWRITE TRANSACTION is included in the section. SETUP TO OMIT TRANSACTION affects the transaction DS if it is related for UPDATE.
The statement SETUP TO INCLUDE TRANSACTION (which copies the transaction record to the end of the master DS) can be included in the BEFORE:T, MATCHED:T, AFTER:T, or UNMATCHED:T section. It affects only the MATCHED:M output DS.
The SHOWING clause [SAVE clause] shows only master records, as modified in BEFORE:M and MATCHED. Records omitted by SETUP TO OMIT MASTER are shown.
The SET clause only affects the records from the Master DS. It affects the MATCHED:M output DS and the SHOWING clause.
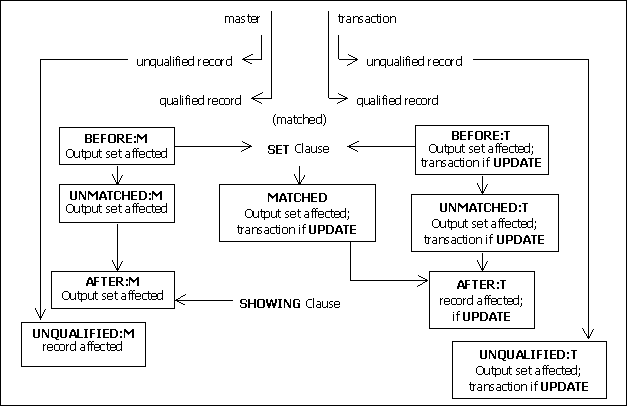
Figure 13-14 SELECT PM
When a Process Module (PM) is executed by the SORT command, the qualified records are sorted before they go through the Record Processing sections of the PM. Assignment and omit statements in the BEFORE, DETAIL, and AFTER section are applied to the output Data Set (DS). An output DS must be named if there is a conditional clause in the command. The master must be related for INPUT. Changes applied by PM sections affect only the output DS if one is specified.
The SHOWING clause uses the field values as modified in the BEFORE and DETAILS sections. Records deleted by SETUP TO OMIT MASTER are also shown. Records are shown in the new sequence in the SHOWING clause.

Figure 13-15 SORT PM
The UPDATE command is designed to modify qualified records in the master Data Set (DS). It can also save a copy of those records in their unaltered state for backup or audit. In a PM called by the UPDATE command, field assignment statements and SETUP TO OMIT MASTER apply to records in the master DS. They do not apply to output DSís.
UPDATE can create any or all of the following output DSís:
MATCHED:M MATCHED:T
UNMATCHED:M UNMATCHED:T
UNQUALIFIED:M UNQUALIFIED:T
For transaction records, assignment statements and SETUP TO OMIT TRANSACTION apply to the transaction output DSís. Assignment statements affect the transaction DS if it is related for UPDATE and the statement SETUP TO REWRITE TRANSACTION is included in the section. SETUP TO OMIT TRANSACTION affects the transaction DS if it is related for UPDATE.
The statement SETUP TO INCLUDE TRANSACTION (which copies the transaction record to the end of the master DS) can be included in the BEFORE:T, MATCHED:T, AFTER:T, or UNMATCHED:T section. It affects both the master DS and the MATCHED:M output DS.
The SHOWING clause [SAVE clause] shows only master records, as modified in BEFORE:M and MATCHED. Records omitted by SETUP TO OMIT MASTER are shown.
The SET clause only affects the records of the master DS. It affects the MATCHED:M output DS and the SHOWING clause.
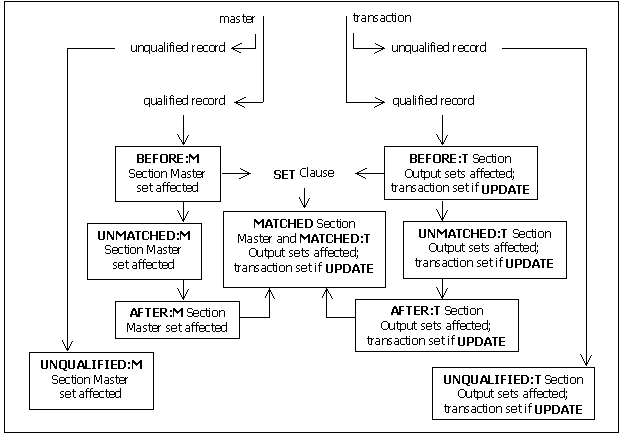
Figure 13-16 UPDATE PM