PURPOSE: This chapter covers the creation of a Database Library (DBL) and few of its objects. These items are needed by ACCENT R to store and use data.
At this point, you should be familiar with some of the ACCENT R concepts and terminology. The example in this chapter assumes that you have invoked ACCENT R and started an Express session without declaring a DBL.
ACCENT R requires that object and field names start with a character. Underscores or periods are the only special characters allowed. Embedded spaces and hyphens are not accepted. Violations of the name rules applied by ACCENT R will result in warnings and prompts to re-enter the data.
In some entry fields, entering a slash will produce a list of existing object names from which to choose from. Entering a question mark will display help text.
An existing DBL can be declared or a new DBL created in several places within Express. With Library (the default option) highlighted in the Master menu, press <RETURN>. The USE DBL option (the default option) in the Library menu (Figure 3) should be highlighted. Press <RETURN> again. A prompt for a library name appears (Figure 8). If a non-existent DBL name is entered, Express prompts for a confirmation to create a new DBL. The default is NO.
![]()
For the example, type in TEST and press <RETURN>. Use the arrow key to select Yes for the confirmation prompt and press <RETURN> again. The DBL TEST is created and ready to store Schema Definitions (SD), that will describe the data entered in an associated DS. A Data Index (DI) will also be created to do the sorting for the associated DS when the data is retrieved.
These same library prompts will appear if you try to enter the Update, Examine, or Define menus without a DBL declared. The LIBRARY option in the Define menu declares or creates another DBL after one has already been declared in the Express session.
Select RETURN in the Library menu and press <RETURN> to go back to the Master menu.
A SD describes the fields of a DS and must be created first. Select Define in the Master menu and press <RETURN>. Select SCHEMA in the Define menu (Figure 6) and press <RETURN>. Express will prompt for an SD name (Figure 9). If working with an existing DBL, you can enter a slash and press <RETURN> to get a selection list of existing SDs. If a non-existent SD name is entered, Express prompts for a confirmation to create a new SD. The default is YES.

For the example, type in MYLIST and press <RETURN>. The confirmation prompt has Yes highlighted so just press <RETURN> again. The SD MYLIST is created which will be used to describe a list of companies in a DS.
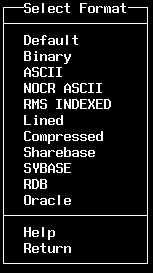
The Select Format menu appears (Figure 10). Refer to the ACCENT R reference manual for more details on the various selections that are available here or highlight an option with the cursor and type a question mark. Some of these formats can be used as a gateway to different database engines (Sybase, Oracle, Rdb, DB-MACH2).
For the example, use the DEFAULT option (same as BINARY) which is already highlighted and press <RETURN>. The format specifies the type of DS that the SD is describing. The default format uses general parameters for ACCENT R's own database (DB-MACH2).

After the format has been selected, the Describe Schema window (Figure 11) will be displayed.

Figure 11 Describe Schema Window
After a field name has been entered, Express prompts for a data type (Figure 12).

|
Character Data |
letters, numbers, special characters |
|
Integer Data |
positive or negative whole numbers |
|
Numeric Data |
positive or negative numbers with a decimal |
|
Date Data |
values can be entered as 9/15/93, 9-15-93, or 930915 |
Use the arrow keys to select the desired data type and press <RETURN>. Enter the field length (and decimal places) if applicable. Express then asks if the field is an array. The default is NO.
After responding to the array prompt, the fields are cleared for the next entry. A listing of the SD fields also appear below the window. To exit this window, press <RETURN> when all the fields are blank.
For the example, enter the following field information:
|
Field name |
Data type |
Field length |
Array |
|
NAME |
Character |
20 |
NO |
|
EMP |
Integer |
3 |
NO |
|
SALES |
Numeric |
8, 2 |
NO |
|
DATE |
date |
- |
- |
NOTE: Numeric data requires a decimal position entry (second number under field length) as well as a field length. The Date data type has a default field length and is not an array.
The Mode menu (Figure 13) appears after the Describe Schema window is exited (refer to Chapter 6 for more details). The default mode is ADD. Select RETURN and press <RETURN>. Express will prompt you to SAVE the schema. The default for the 'save' prompt is YES. Press <RETURN> to save.

After the SD is saved, Express asks if you want to create a DS for the saved schema. The default is YES. Press <RETURN>. Express then prompts for the name of the DS (Figure 14). The default DS name is the same as the SD name. For the example, accept the default name and press <RETURN>. Data will be entered into DS MYLIST later.
![]()
The same DS prompt will appear if DATA SET is selected from the Define menu. This option can be used to create a second DS. If an existing DS name is entered, Express will ask if you want the current one removed. The default is NO. A second removal warning is also given. A prompt for the SD name appears next. Specify the SD that will describe the DS. The default SD name is the last SD created. More than one DS can be associated with the same SD. If more than one SD exists, another name can be entered. If a non-existent SD name is entered, Express prompts for another SD name.
Select DATA INDEX from the Define menu and press <RETURN>. Express prompts for a DS name to associate with the index. The default DS name is the current SD name. Enter a slash to get a listing of possible DS names to specify. For the example, accept the default by pressing <RETURN>.
Express then prompts for the index name (Figure 15). The default DI name is the current DS name. If the DI name already exists, Express allows you to remove or modify the DI via a menu. If neither action is desired, you may return to the Define menu. For the example, enter SMPLIST and press <RETURN>.
![]()
Next, Express prompts for a domain name (Figure 16). An existing domain name can be entered to overwrite an old domain. For the example, type NAME and press <RETURN>. The domain contains the fields that the data will be sorted by during retrieval.
![]()
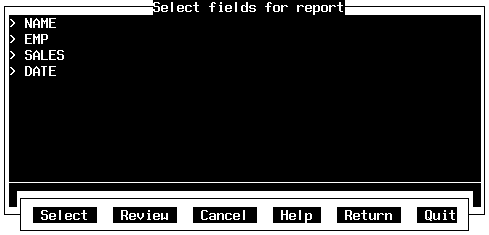
The field selection window is displayed (Figure 17) after the domain name is entered. This window lists the fields in the SD. Use the arrow keys to highlight selected fields. Pressing <RETURN> while a field is highlighted will select the field for sorting. Selection is indicated by an arrow to the left of the field name. Pressing <RETURN> on a field that is already selected will de-select the field.

Figure 17 Field Selection Window
If there is more than one page of fields from a large SD, press <LINEFEED> to the next page or <BACK SPACE> to go back a page. Press <CTRL> Z to accept the field selection and go to the next prompt.
Pressing <CTRL> W will display a menu at the bottom of the window with the following options:
|
SELECT |
returns control to the field selection window |
|
REVIEW |
lists the selected fields in a review window |
|
CANCEL |
de-selects any fields that were selected |
|
HELP |
displays help text |
|
RETURN |
returns control to the Define menu |
|
QUIT |
terminates the Express session |
The Review window has the following menu options:
|
NEXT SCREEN |
advances to the next screen when multiple pages are used |
|
PRIOR SCREEN |
backs up a page when multiple pages are used |
|
RETURN |
return to the field selection window |
|
EXIT |
terminates the Express session |
For the example, select NAME and SALES then press <CTRL> Z.
A prompt appears to confirm the field selection for the domain. The default is YES. Selecting NO will send control back to the field selection window. Press <RETURN> to accept the default and go on to the next prompt.
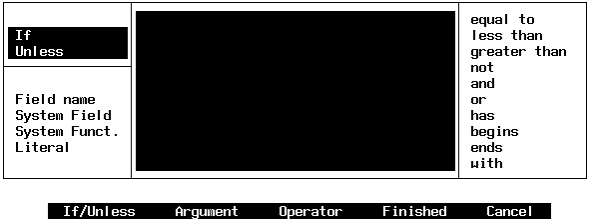
Express asks if the domain fields have a condition. The conditions are used to include or exclude portions of the data. Multiple criteria can be specified for a single index. The default is NO. For the example select YES and press <RETURN>. The condition window (Figure 18) appears. A conditional statement is built through the condition window.

IF/UNLESS is the qualifier selected from the top left comer of the condition window. This section is active when the condition window is invoked.
A field name, System Field (list displayed when selected), System Function (list displayed when selected), or a specified literal is used as an ARGUMENT. This option activates the bottom left of the condition window. Refer to the ACCENT R reference manual (or invoke help at the ACCENT R command line outside of Express) for more information on the system fields and functions.
The OPERATOR option activates the list on the right side of the condition window. You can specify numerical operators (equal to, greater than, less than), character operators (has, begins with, ends with), opposite operator (not), or compound operators (and, or).
Control is transferred to the menu at the bottom of the window after a selection is made in the window. For multiple page listings, use the Linefeed key to scroll forward and the backspace key to scroll backward. CANCEL returns control to the condition prompt that called the condition window. Use FINISHED after the condition statement is complete to exit the criteria window.
For the example, select IF (highlighted by default in the top left comer of the window) by pressing <RETURN>. Control is sent to the menu below the condition window.
Select ARGUMENT and press <RETURN>. The argument list (field name, System Field, System Function, or literal) will become active (bottom left of window). Select field name and press <RETURN> which causes the SD fields to be listed in the center of the window. Select SALES and press <RETURN>. Control is returned to the menu below the condition window. Notice how the conditional statement is being built below the window menu.
Select OPERATOR and press <RETURN>. The operators listed on the right side of the window become active. Select the 'greater than' operator and press <RETURN>. Control is returned to the menu below the condition window.
Select ARGUMENT and press <RETURN>. Select Literal and press <RETURN>. A prompt for a literal is displayed in the center of the window. Enter 100 then press <CTRL>Z to return to the window menu.
The condition statement includes data if Sales is greater than 100 dollars. Select FINISHED and press <RETURN> to see the next prompt.
Express asks if the fields are to allow duplicate values. The default is YES. For the example, accept the default and press <RETURN>.
Express then asks if changes are to be allowed to key values. The default is YES. For the example, accept the default and press <RETURN>.
The domain prompt re-appears for the next entry after the 'key value' prompt has been answered. More than one domain can be specified in a DI. Press <RETURN> with the prompt field blank to get back to the Define menu. Select RETURN and press <RETURN> to back to the Master menu.