PURPOSE: This chapter explains how data is entered and maintained through the Update menu. Now that the Database Library (DBL), Data Set (DS), Schema Definition (DS) have been created, data entry is possible. The Data Index (DI) is used for sorting data into a meaningful order during retrieval. However, a DI is not needed to enter data.
When a DS is opened for updating, it cannot be used by anyone else until the update is complete. If a DI is associated with the DS being modified, Express also updates the DI.
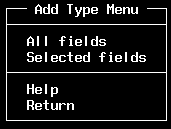
Select Update in the Master menu then press <RETURN>. The Update Menu appears with the ADD mode highlighted by default (Figure 4). Press <RETURN> for the Add Type Menu (Figure 19) to be displayed.

You can enter data for all or selected fields. Express will prompt for a field selection if SELECTED FIELDS is chosen.
NOTE: Refer to the 'Changing Data' section later in this chapter to see how the field selection window works.
For the example, select ALL FIELDS (the default) and press <RETURN>. Express will prompt for the DS name. You can enter a slash to get a list of available DSs. Pressing <RETURN> without making an entry will return control back to the Update menu. Typing in a non-existent DS name will cause Express to display an error message. Press <RETURN> to go back to the DS name prompt. For the example, type in MYLIST and press <RETURN>.
Express then asks if you want to save the Process Module (PM) that creates the fill screen (DS entry form) for later use. You may respond YES, NO or return to the Update menu without taking any action. Accept the default. (YES) by pressing <RETURN>.
Express prompts for a fill screen name (Figure 20) that will be used for the PM. An existing PM name can be entered to overwrite the old version.

This PM can be used outside of Express by typing:
USE PM pm_name
at the ACCENT R command prompt. The fill screen PM can be customized for special needs by entering:
MODIFY PM pm_name
At the ACCENT R command prompt. A fill screen PM can also be saved through the CHANGE option of the Update Menu. For the example, enter COFILL as the fill screen PM name.
The Input Form (Figure 21) is displayed with a menu.

The Input Form menu commands include:
|
ADD |
stores current record and clears fields for new record entry (default) |
|
MODIFY |
accesses current record for changes |
|
PAGE |
selects page for a multiple page input form (used with large DS) |
|
DUPLICATE |
saves current record and copies its values for the next record |
|
CANCEL |
clear current record entry |
|
HELP |
displays help text |
|
RETURN |
returns to previous prompt |
|
QUIT |
exits Express |
Select ADD to access the data entry fields. You can move from field to field with the Return key, Tab key, or the left/right arrow keys. When the last space in a field is given an entry, Express automatically moves to the next field. Express checks every item entered to make sure it matches the characteristics you specified for that field. If an invalid entry is attempted (such as entering letters for a numeric field), the terminal will beep. Control is returned to the menu by pressing <CTRL>Z or when the last space in the last field is given an entry.
Select ADD again and press <RETURN> to store the current record and open a new one. For the example, enter the data listed below.
|
NAME |
EMP |
SALES |
DATE |
|
ABC |
200 |
4500.00 |
04/03/93 |
|
XYZ |
75 |
2100.30 |
04/03/93 |
|
NUSOFT |
50 |
3096.00 |
02/21/93 |
|
MASSWARE |
10 |
78.99 |
01/17/93 |
|
INTEK |
25 |
530-00 |
03/30/93 |
NOTE: Cents do not register in the Sales field unless there is digit other than 0 to the right of the decimal point.
When ADD is selected to enter the next record or when RETURNing to the Update menu, Express notifies you that the current record has been saved.
Use DUPLICATE after the first record is saved to keep the same date for the second record. Use CANCEL or MODIFY if entry errors occur. Press <CTRL> R to refresh the screen if necessary.
Select RETURN after the last record has been saved. Press <RETURN> to go back to the Update menu.
Data may need to be updated for a variety of reasons:
data entry errors to be corrected
changes in data to be updated
new data to be entered
old data to be deleted
If new data needs to be entered after the initial data entry, select ADD from the Update menu and proceed as explained in the preceding section.
You may select CHANGE, ALTER, or DELETE from the Update menu to meet your other data editing needs. These options are described in the following sections. In each case, you may specify criteria for selecting the records to be updated.
To modify previously entered data, select CHANGE from the Update menu and press <RETURN>. You are prompted for a DS name. You can enter a slash to get a list of available DSs. Enter MYLIST to make changes to the example DS.
Express asks if you want to save the fill screen Process Module (PM) that will be generated for editing data. You may respond Yes, No or return to the Update menu without taking any action. For the example, accept the default (YES) by pressing <RETURN>.
Express prompts for a fill screen name (Figure 20) that will be used for the PM. An existing PM name can be entered to overwrite the old version. This PM can be used outside of Express.
NOTE: See the 'Saving The Entry Form' section earlier in this chapter for more details on how to use the PM.
Enter COUPD and press <RETURN>. The Select Field for Update window will appear (Figure 22).
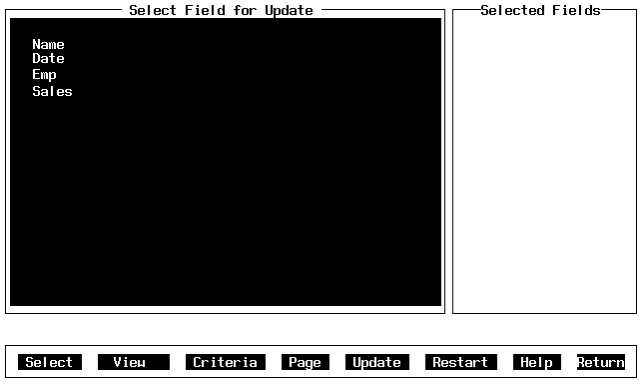
Figure 22 Select Field for Update Window
The Select Field window has eight commands in its menu:
|
SELECT |
access field list for selection |
|
VIEW |
preview update form |
|
CRITERIA |
specify conditions for update |
|
PAGE |
go to next page; used with large DS with many fields |
|
UPDATE |
invoke update form for editing |
|
RESTART |
clear selections |
|
HELP |
display help information |
|
RETURN |
90 back to the Update menu |
SELECT is the default option (already highlighted). Press <RETURN> to access the field list for selection. Use the arrow keys to position the cursor and press <RETURN> to select a field. At least one field must be selected. Reselecting a previously selected field will cancel the selection. The fields can be selected in any order. The order determines how the update form is put together. When a field is selected, Express will prompt for a mode (Figure 23).
![]()
Select CHANGE and press <RETURN> to allow editing of the field in the update form. Select SHOW and press <RETURN> to display the field in the form, but not allow editing. Select IGNORE and press <RETURN> to nullify the selection.
For the example, select NAME and DATE for Show. Select EMP and SALES for Change.
As the fields and their mode are selected, they appear in the right column beside the field selection window. The field name is followed by /S or /C to indicate the Show or Change mode. Press <CTRL> Z to return to the menu.
NOTE: Refresh the screen by pressing <CTRL> R when needed.
VIEW is used to see the update form as it is being developed. Modifications can be made before the PM is generated. Thus time is saved by not having to 'cycle' through the menus to get back to the selection window.
CRITERIA specifies a condition for updating. This feature is optional for updating data. Fields are selected in the same way as under SELECT. Arrows indicate selected fields. A criteria prompt (Figure 24) is displayed.
![]()
Figure 24 Criteria Window (example entry)
Pressing <RETURN> with no entry will return control to the selection window. If an error is made, a syntax message is displayed and the criteria window is cleared for another entry. Enter a question mark to get help on the possible entries. A record must meet the criteria before it can be accessed for updating.
For the example, move the cursor to CRITERIA and press <RETURN>. Select EMP and press <RETURN>. Enter > 49 in the criteria window, then press <RETURN>. This condition means companies must have 50 employees for their record to be accessed for updating.
Move the cursor to UPDATE and press <RETURN> to invoke the update form (Figure 25).
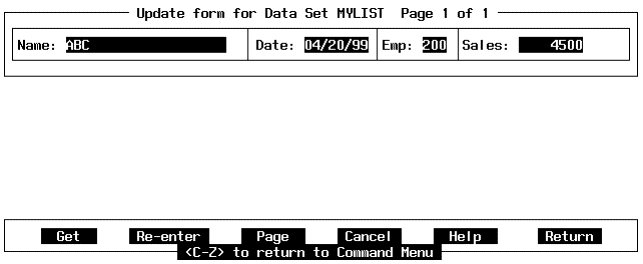
The Update Form has six commands in its menu:
|
GET |
go to the next record |
|
RE-ENTER |
make more changes to the current record |
|
PAGE |
go to next page of update form; used if editing a large DS with many fields |
|
CANCEL |
ignore changes entered |
|
HELP |
display help information |
|
RETURN |
go back to the Update menu |
The first record is displayed when the update form is invoked. You may use the Tab, Return, or left/right arrow keys to move through the form fields. You cannot edit specific characters in a field. Once a character is typed in a field, the original entry is erased. Control is returned to the menu by pressing <CTRL> Z or making an entry in the last space of the last field.
GET is the default command (already highlighted). Press <RETURN> to display the next record. The cursor will go back to the form to edit the next record. After the last record is accessed, Express will display a message that record processing is complete. You cannot go backwards through the records.
If an error is made, select CANCEL and press <RETURN> to return to the original entry. Select RE-ENTER and press <RETURN> to edit the same record again. If a change is made to a record, Express will display the message "Record has been saved" when GET or RETURN is selected and <RETURN> is pressed.
When finished editing, select RETURN to go back to the Update menu.
NOTE: ALTER is used to make global changes where each selected field will be changed to the same value in every record. Conditions can be specified to limit the alterations to certain records. Use the ALTER function cautiously.
To make global changes to your data, select ALTER from the Update menu and press <RETURN>. You are prompted for a DS name. For the example, enter MYLIST. After a DS name is entered, the Alter menu (Figure 26) is displayed.

The Alter menu has six options:
|
SET VALUES |
select fields to be altered; specify alternate values |
|
CRITERIA |
specify conditions for altering data |
|
RUN |
execute the data alterations |
|
HELP |
display help information |
|
RETURN |
go back to the Update menu |
|
QUIT |
exit Express |
SET VALUES is the default selection (already highlighted). This option must be used before attempting to RUN the alteration. Press <RETURN> to invoke the field selection window (Figure 27).
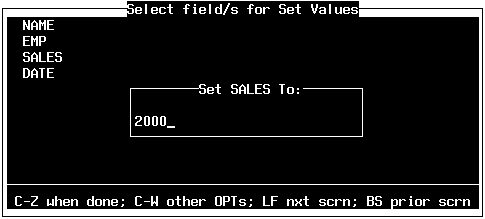
Figure 27 Set Values Field Selection (with SET TO insert)
Use the arrow keys to place the cursor and press <RETURN> to select a field for altering. Selected fields are indicated by an arrow. Re-selecting a previously selected field will cancel the selection. For the example, select SALES and press <RETURN>.
Express will then prompt for a value after a field is selected. For the example, type in 2000 and press <RETURN>. (Effect: Every record in DS MYLIST may now have its SALES field changed to 2000.) For character fields, quotes are required with the entry.
Press <CTRL> W to see the command menu for the Field Selection window. There are six options:
|
SELECT |
access field list for selection |
|
REVIEW |
display list of selected fields |
|
CANCEL |
clear selections |
|
HELP |
display help information |
|
RETURN |
90 back to the Alter menu |
|
QUIT |
exit Express |
Press <CTRL> Z while in the field list window to return to the Alter menu.
To limit the global change, select CRITERIA from the Alter menu. This feature is optional in altering data. Another field selection window (Figure 28) is displayed.

Figure 28 Criteria Field Selection
This window is similar to the SET VALUES field selection window. Select fields in which conditions must be met in order to do the global alterations. For the example, move the cursor to highlight EMP, press <RETURN>, then press <CTRL> Z.
If no field is selected for a criteria, selecting RETURN from the menu and pressing <RETURN> (or pressing <CTRL> Z while the window is active) returns you bark to the Alter menu. If a field has been selected, selecting RETURN from the menu and pressing <RETURN> (or pressing <CTRL> Z while the window is active) invokes a Selection Criteria window (Figure 29).

Figure 29 Selection Criteria Window
This window is used to specify the criteria for the selected fields. Express prompts for each field in succession if multiple fields are selected. The window contains helpful entry hints. Values for character fields require quotes. For the example, type < 50 and press <RETURN>. (Effect: SALES will be changed to 2000 in every record of DS MYLIST where the number of employees is less than 50.)
After the criteria has been specified, you will then be returned to the Alter menu. Select RUN and press <RETURN> after the fields have been selected for altering with their specified values and criteria set (if desired). Express will display a processing message when alteration has been completed "Number of records altered Press <CR> to continue..." (where # is the number of records altered).
Select RETURN and press <RETURN> to go back to the Update Menu.
To delete records, select DELETE from the Update menu. Express prompts for the name of the DS to edit. For the example, enter MYLIST. The Delete menu (Figure 30) is displayed.

The Delete menu has six options:
|
SELECT FIELDS |
select fields for criteria |
|
CRITERIA |
specify conditions for deleting data |
|
RUN |
execute the deletions |
|
HELP |
display help information |
|
RETURN |
go back to the Update menu |
|
QUIT |
exit Express |
SELECT FIELDS is the default selection (already highlighted). Both SELECT FIELDS and CRITERIA must be used before attempting to RUN the deletion. Press <RETURN> to invoke the field selection window (Figure 31). This window is similar to the field selection window displayed for the alter function.

Figure 31 Select Fields Window
Use the arrow keys to place the cursor and press <RETURN> to select a field for altering. Selected fields are indicated by an arrow. Re-selecting a previously selected field will cancel the selection.
Press <CTRL> W to see the command menu for the Field Selection window. There are six options:
|
SELECT |
access field list for selection |
|
REVIEW |
display list of selected fields |
|
CANCEL |
clear selections |
|
HELP |
display help information |
|
RETURN |
go back to the Delete menu |
|
QUIT |
exit Express |
SELECT is the default option (already highlighted). Press <RETURN> to activate the selection window. For the example, move the cursor to highlight NAME, press <RETURN>, then press <CTRL> Z to go back to the Delete menu.
Select CRITERIA to invoke the Criteria Selection window (Figure 32). This window functions the same as the criteria window displayed for the alter function. For the example, enter ='ABC' for the NAME condition and press <RETURN>. (Effect: Records with ABC in the NAME field is set to be deleted.)
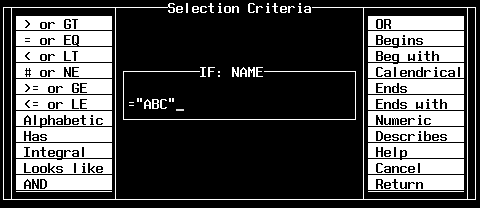
Figure 32 Select Criteria Window
If multiple fields were selected for the criteria function, they will be prompted for in succession. When the last field is given a criteria, control is returned to the Delete menu.
Select RUN and press <RETURN> to execute the deletion. Express will display a processing message - "Number of records deleted = # Press <CR> to continue..." (where # is the number of records deleted).
Select RETURN and press <RETURN> to go back to the Update menu. Repeat this step to return to the Master menu.